The other day I was looking into creating transparent tunneling using my router (with dd-wrt version 24 sp 2) and ProXPN. This would be handy in any number of situations to include the ability to proxy those devices which don't naturally have that ability (i.e.: the internet of things). Sadly, there seems to be a dearth of information regarding how to set this up, so after some research and floundering on my own, here's how I've gotten it to work.
This tutorial assumes that you already have dd-wrt installed and have some working knowledge of using the product. While the write-up is geared towards dd-wrt and ProXPN in particular, the basic concepts should be extendable to other products.
Step 1: Creating a password file
For your router to connect to ProXPN, it needs to know your username and password. There are a few options here, but the solution I've gone with is creating a proxpn_user.conf file containing your login information.
(Optional) Step 1a: Make Jffs Writeable
There's a nice write-up on how to do this on the dd-wrt website: http://www.dd-wrt.com/wiki/index.php/JFFS The reason why doing this is nice is because it allows you to save information past reboots. It's not required, but if you don't do this you will need to re-create your login file every time the router reboots.
Step 1b: Create the file
Now we will create the login file. You can do this any way you want, but I prefer to work on the command line.
$ ssh root@<router ip>
root@Gates:~# cd /jffs
root@Gates:/jffs# ls -la
drwxr-xr-x    4 root     root             0 Jan  1  1970 .
drwxr-xr-x   15 root     root           162 Apr 18  2014 ..
drwxr-xr-x    3 root     root             0 Oct 21  2014 tmp
root@Gates:/jffs# echo "MyUsername" >> proxpn_user.conf
root@Gates:/jffs# echo "MyPassword" >> proxpn_user.conf
root@Gates:/jffs# cat proxpn_user.conf
MyUsername
MyPassword
root@Gates:/jffs# chmod 600 proxpn_user.conf
Note that if you skipped step 1a, you will need to choose a different path here, such as /tmp/openvpncl.
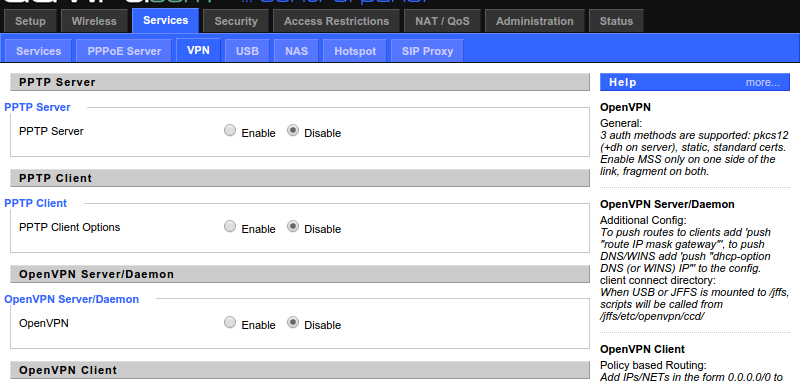
Step 2: Configure VPN
I use the nice GUI to configure the VPN. First off, navigate to the VPN tab. Click on "Services" then "VPN".
Next, copy these settings:
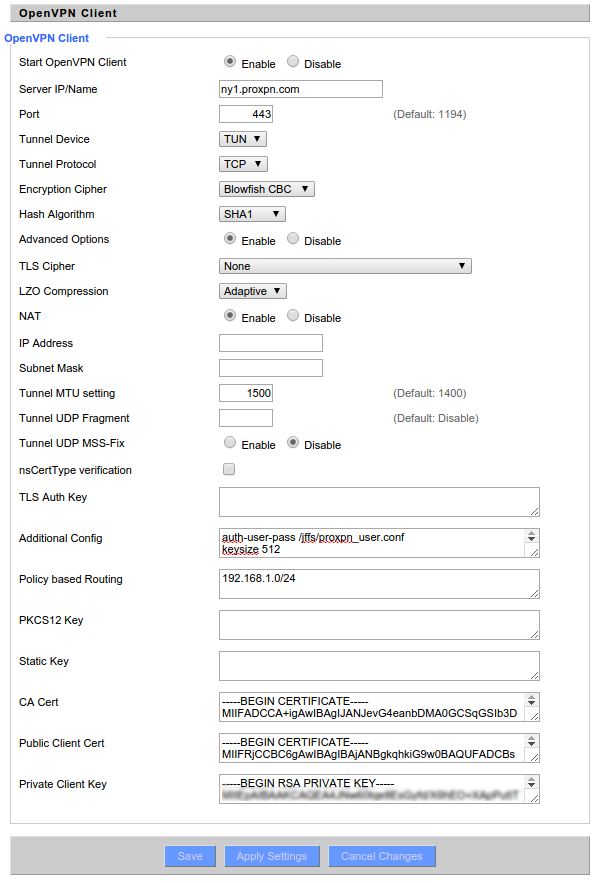
A couple of these settings to point out:
Additional Config
auth-user-pass /jffs/proxpn_user.conf
keysize 512
keepalive 5 30
Note that "auth-user-pass" might be different if you had to store your password elsewhere.
Policy Based Routing
This setting allows you to control what gets routed out the VPN and what doesn't. For instance, maybe you only want your laptop to go out the VPN and not your desktop. In that case, change this to <ip of laptop>/32. You can have as many lines as you want, each describing what should be forwarded. In this case, I'm asking the router to forward all of the 192.168.1.x subnet.
Certs and Keys
These can be found in different places depending on what distro you're using. However, all platforms have the same basic setup. There's a directory that will contain the proxpn ovpn file. In the Windows version, the Certs are copied into that file for you. On the Mac/Linux distribution, the certs you're looking for are in a subdirectory called "ssl".
$ pwd
/home/user/proxpn/MacOSX/config/ssl
$ ls -la
total 28
drwxrwxr-x 3 user user 4096 Feb 26  2012 .
drwxrwxr-x 4 user user 4096 Sep  4 23:44 ..
-rwxrwxr-x 1 user user 1793 Mar  9  2011 ca.crt
-rwxrwxr-x 1 user user 5484 Mar  9  2011 client.crt
-rwxrwxr-x 1 user user 1679 Mar  9  2011 client.key
Just copy those in to the respective fields in the GUI. Now just click the "Apply Settings" button at the bottom and wait for a minute or two for it to set up.
Troubleshooting
Dd-wrt provides a web UI way to view the OpenVPN logs:
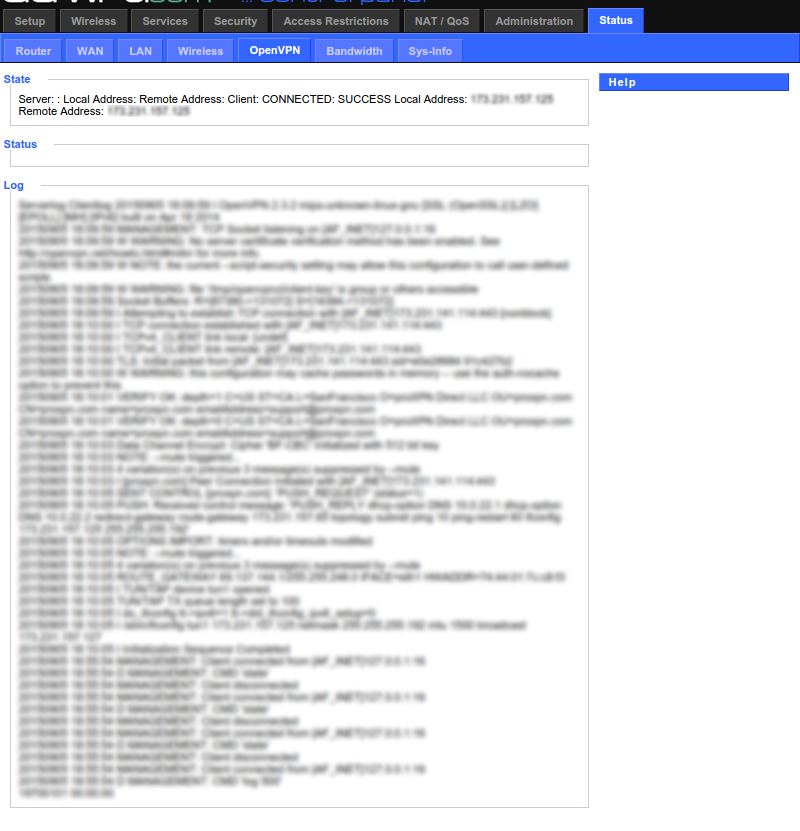
One thing you want to look for is the "mismatch" warnings. If things aren't working as expected, sometimes it's because the configuration you're using is different than the one that the server is using. This is especially useful if you're trying to adapt this config to a different VPN provider. Generally speaking, if you get a mismatch warning, just go and set the dd-wrt VPN config to what the log is saying the remote server has set.
Caveats
While not exactly a caveat, I've noticed that my version of dd-wrt does not implement "ip rule" command completely. This is likely the reason why it doesn't actually flush the policy based routing rules. What does this mean? Here's an example:
- Set up VPN to route 192.168.1.5, click "Apply"
- 192.168.1.5 is now successfully being routed over the VPN
- Click "disable" radio button and click "Apply".
- 192.168.1.5 is now not being VPN'd
- Click "enable" and change IP being routed to 192.168.1.6
- Click "Apply"
At this point, you would likely expect 192.168.1.6 to be routed over the VPN. While this is true, the gotcha with this router (or at least my version of it), is that 192.168.1.5 is also being routed over the VPN even though it's no longer specified. This is because of how the policy based routing works and in dd-wrt how it is sorta not working.
On setting up and connecting to the VPN, dd-wrt executes this:
#!/bin/sh
iptables -I POSTROUTING -t nat -o tun1 -j MASQUERADE
iptables -I INPUT -i tun1 -j ACCEPT
iptables -I FORWARD -i tun1 -j ACCEPT
iptables -I FORWARD -o tun1 -j ACCEPT
for IP in `cat /tmp/openvpncl/policy_ips` ; do
	 ip rule add from $IP table 10
done
ip route add default via $route_vpn_gateway table 10
ip route flush cache
echo $ifconfig_remote >>/tmp/gateway.txt
echo $route_vpn_gateway >>/tmp/gateway.txt
echo $ifconfig_local >>/tmp/gateway.txt
First it sets up the iptables to masquerade. The interesting part for this problem is the for loop. What this does is it takes in your "policy routing" lines, and for each of them creates a routing rule to use table 10, then defines table 10 as using the VPN. All very common.
Now let's look at what happens when we disconnect from the VPN:
#!/bin/sh
iptables -D INPUT -i tun1 -j ACCEPT
iptables -D POSTROUTING -t nat -o tun1 -j MASQUERADE
ip route flush table 10
First off, it clears the masquerade iptables rules and flushes the route table. What it doesn't do is clear the routing rules that were created in the for loop above. What this means is the next time you connect to the VPN, the rules for 192.168.1.5 are still in dd-wrt and are point to table 10. When you connect, you recreate that table, and now your original IP is being routed through the VPN without being asked to.
The simple solution here is to reboot your router if this is affecting you. Remember, this only affects you if you're changing what IPs are being policy routed. If you're always routing the same IPs, you're fine.
ProXPN Servers
I saw a lot of posts asking about the server names and IP addresses for ProXPN. While that information isn't documented well on their website, every install has a copy of this information in the locations.xml file that's included. That being said, for convenience you can also click the following link to see the current addresses as of writing:
https://raw.githubusercontent.com/Owlz/Misc/master/tutorials/dd-wrt-proxpn/locations.xml